TL;DR: Select Add on a data tab of your project. Drag files from your computer or from the file explorer into the Drop Zone, check the type and Primary source SDX-Cloud detected, and start the import. For data models you can group files into several datasets, and image datasets get their own processing settings.
What the Drop Zone does
The Drop Zone replaces the former import process. Every data tab of a project opens an import window with the file explorer on the left and a drop area on the right.
| Tab | Window | What you drop | What you set |
|---|---|---|---|
| Data models | Create datasets | Point clouds, meshes, IFC, images, or orthophotos | Datasets, units, processing settings for images, name and capturing date |
| Reference models | Create reference model | A file from the file explorer or your computer | Name, Gradient, Z-axis displacement |
| Orthophotos | Import orthophoto | GeoTIFF files (.tif, .tiff) | Tags |
| 2D plans | Import 2D plan | DXF files | Tags |
Open the Drop Zone
The rest of this article describes the Create datasets window of the Data models tab.
- Open your project and go to Data.
- Select the tab for the kind of data you want to add: Data models, Reference models, Orthophotos, or 2D plans.
- Select Add.
The import window
Left side
- File explorer shows the files of the project, with Search, a column filter (All columns), a reset button for filters, refresh, download, and Add to upload files.
- Data models and Reference models list the data models and reference models already in the project, with Name, Status, and Created at.
Right side
- All datasets (arrow at the top left) goes to the list of datasets in this import.
- A label shows the kind of dataset: Direct import for files that are imported as they are, or Photogrammetry for images that SDX-Cloud processes.
- Dataset name is filled in from the first file you drop. You can change it.
- The Drop Zone itself: "Drag and drop files here – point clouds, meshes, IFC, images or orthophotos".
At the bottom, Cancel closes the window without importing, Back returns to the previous step, the dots show the step you are on, and Next goes on. Next is available once the dataset has a usable primary file.
Get files into the Drop Zone
- Drag files from your computer into the Drop Zone. They are uploaded and also saved in the file explorer. The activity center opens on File transfers > Uploads and shows each upload.
- Drag files that are already in the file explorer into the Drop Zone.
What each file shows
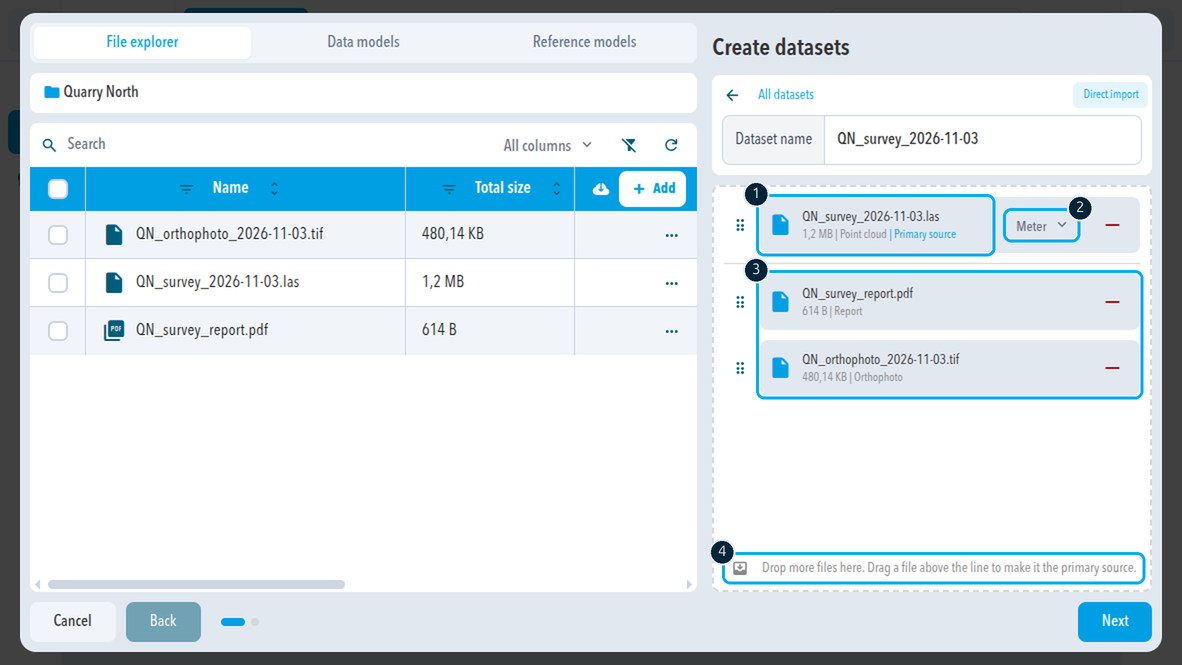
After you drop a file, it appears in the dataset with:
- Name and size.
- Detected type, for example Point cloud, Mesh, IFC model, Orthophoto, Images, or Report (a PDF).
- Primary source on the primary file.
- Unit for point clouds, meshes, and IFC models: Meter, Feet, or US survey feet. Set the unit the file was saved in.
- Remove (minus button) takes the file out of the dataset. It stays in the file explorer.
A file with a red frame and an error icon cannot be used, for example because SDX-Cloud cannot read it. Remove it and check the file.
Messages when you drop a file
| Message | What it means |
|---|---|
| This dataset already contains a file of this type. | A dataset holds one file of each type. Put the second file into its own dataset. |
| This file type isn't supported. | SDX-Cloud cannot import this format. See the supported formats. |
Datasets
A dataset is one set of files that belong together, for example one point cloud with its orthophoto, or the images, ground control points, and PPK files of one flight. One data model can hold several datasets.
Direct import datasets
A dataset that starts with a point cloud, mesh, IFC model, or similar file is a Direct import dataset. You can add further files of other types to it, for example an orthophoto, images, or a PDF report.
Photogrammetry datasets
A dataset that starts with images is a Photogrammetry dataset. It shows the number of images under PHOTOS and has a place for each supporting file:
- Ground control points: a CSV file with ground control points.
- Rover observation file: observation file recorded by the drone (.obs).
- Base station observation file: observation file of the base station (.obs).
- Base station navigation file: navigation file of the base station (.nav).
- MRK file: image timestamp file of the drone (.mrk).
Drop more images, the CSV, and the PPK files into the same Drop Zone. A point cloud or other model file is not added to a photogrammetry dataset; give it its own dataset. A ground control point file only works in a dataset with images.
The list of datasets
All datasets lists every dataset of this import. Each one shows its name, the number of files, its label (Direct import or Photogrammetry), and the file types it holds, for example LAS: 1.
- Filter narrows the list when an import has many datasets.
- + creates a new, empty dataset with its own name and Drop Zone.
- The minus button removes a dataset from the import.
Primary and secondary files
Each dataset has exactly one primary file, marked Primary source. SDX-Cloud uses it to calculate the combined surface, the rasterized point cloud behind comparisons and volume calculations. All other files in the dataset are secondary. Use a point cloud or a mesh as the primary file when you want comparisons and volumes from the dataset.
- Only a point cloud or a mesh can be the primary file, and a data model dataset needs one. Drop it first, or drag it above the line. Orthophotos, images, and PDF reports are always secondary files.
- If you drop several files at once, for example a LAS file and a mesh, SDX-Cloud picks the primary file at random. Check it and correct it.
- To change the primary file, drag another file above the line that separates it from the secondary files. The Drop Zone reminds you: "Drag a file above the line to make it the primary source."
- A secondary mesh is shown in the viewer. It does not feed the combined surface.
Processing settings for images
If the import has a photogrammetry dataset, Next opens Processing Settings before the last step. It starts with the defaults of your organization.
- Provider: who processes the images, for example Processing by Sodex.
- Point Cloud Density: Medium or High. A higher density gives more points in the final point cloud. Medium is sufficient for most applications.
- Orthophoto Resolution: the ground size of one orthophoto pixel, in cm. A finer resolution does not cost more credits, but gives a larger file.
- Cost estimate: your current photogrammetry credits, the credits this import uses, and the credits that remain, plus the number of images. Go to shop opens the shop if you need more credits.
Photogrammetry starts automatically after the import.
Name and start the import
The last step, Snapshot metadata, describes the new data model:
- Name (required): filled in from the first dataset.
- Description.
- Get creation date from images: on by default when the import has images. It takes the capturing date from the images.
- Capturing date (required): when the data was captured.
- Tags.
Select Import snapshot to create the data model and start processing. You can follow it under Processing jobs.
What SDX-Cloud detects
- DJI drone data is recognized as images for processing.
- A trajectory is drawn from the image positions in the EXIF tags. The RTK status is shown for drone and PocketScan captures.
- ZIP files are opened automatically. SDX-Cloud finds drone data, PPK data, and ground control points inside.
Orthophotos
- To import an orthophoto on its own, use the Orthophotos tab.
- To add an orthophoto to a data model, give the dataset a different primary file first, such as a point cloud or a mesh bundle. The orthophoto is then a secondary file.
Coordinate system and limits
- Your project sets the coordinate system when you create it. Files you import must already use that coordinate system.
- Each organization has a maximum amount of imported model data.
Comments
0 comments
Please sign in to leave a comment.