TL;DR: Reference models are now both shown and compared. Add one on Data > Reference models with Add, set its Gradient and Z-axis displacement, and in the viewer turn on Model to see it or Comparison to see the difference to your data. The separate 3D plans section is gone: your former 3D plans are in the reference models list under their original names.
What changed
Before this release, reference models were surfaces from point clouds, XML, and DXF files, and you could use them only for comparisons. 3D plans were XML and DXF surfaces that you could only visualize.
Now the two are one. A reference model can be visualized and compared. The older name for a reference model was reference terrain. Both names mean the same thing.
What happens to your 3D plans
- All existing 3D plans move into reference models automatically during the release maintenance window. You do not need to do anything.
- Migrated models keep their names. Nothing marks them as former 3D plans.
- You can use a migrated model for comparisons right away. No extra calculation is needed.
- The 3D plans tab disappears from Data. The tabs are Data models, Snapshots, Reference models, Orthophotos, and 2D plans.
The reference models list
Open your project and go to Data > Reference models. The … menu of a row has Edit and Delete. The list has these columns:
| Column | Shows |
|---|---|
| Name | The name of the reference model |
| Status | For example Finished when the model is ready |
| Description | Your description, if you added one |
| Type | How the model was made, for example Manually generated |
| Gradient | The color scale for comparisons |
| Z-axis displacement | The height offset, for example 0 m |
| Unit | The unit of the source file |
| Created at, Created by | When and by whom the model was added |
Add a reference model
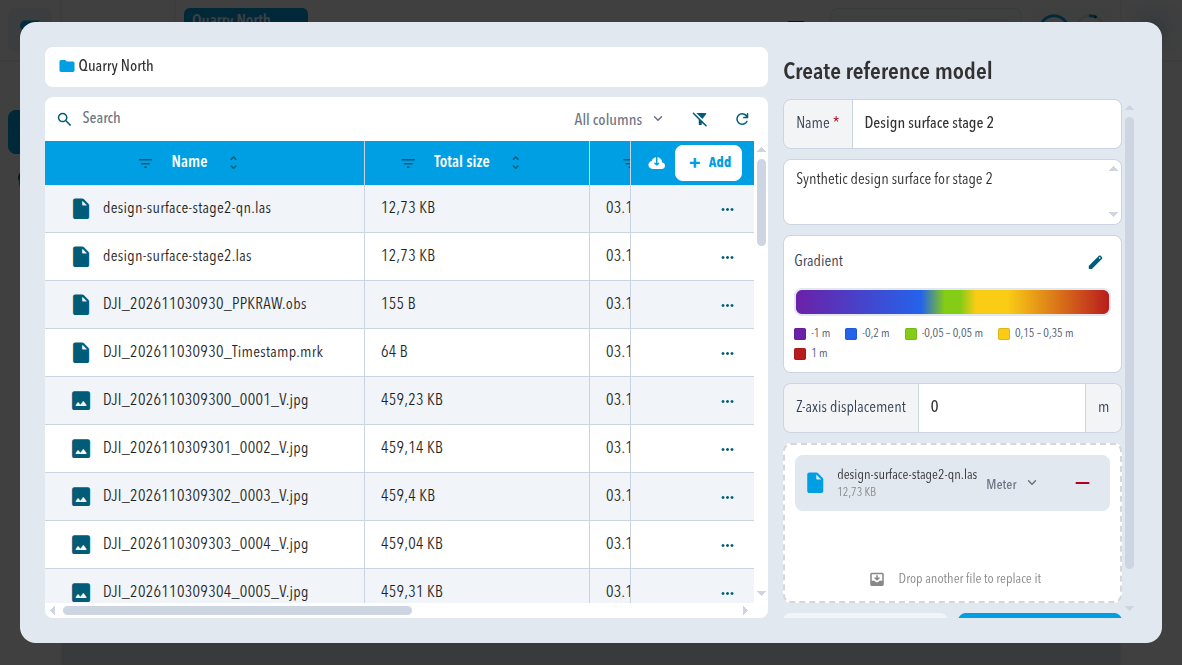
- Open your project and go to Data > Reference models.
- Select Add. The Create reference model window opens, with the file explorer on the left.
- Enter a Name.
- Check the Gradient. Select the edit button to change it.
- Enter a Z-axis displacement in m if the model needs a height offset. Leave 0 otherwise.
- Drag the file into the Drop Zone, from the file explorer or from your computer.
- Select Create.
Fields in the window
The file must use the coordinate system of the project.
| Field | What it does |
|---|---|
| Name (required) | The name in the list and in the viewer |
| Description | Optional text that appears in the list |
| File unit | The unit the file was saved in, for example Meter |
| Gradient | The colors of the comparison. By default the bands are -1 m, -0,2 m, -0,05 – 0,05 m, 0,2 m, and 1 m. |
| Z-axis displacement | Moves the whole model up or down by this many meters |
| Drop Zone | "Drag a file here from the file explorer or your computer" |
Change the gradient
The edit button next to Gradient opens the gradient editor. Each stage colors a single value or a range, and the values between stages blend smoothly. See SDX-Cloud: Configure the gradient.
Edit a reference model
Select … > Edit in its row. Edit reference model has Name, Description, Gradient, Z-axis displacement, and File unit (for example Meter). Select Apply to save or Cancel to close without changes.
Show and compare a reference model in the viewer
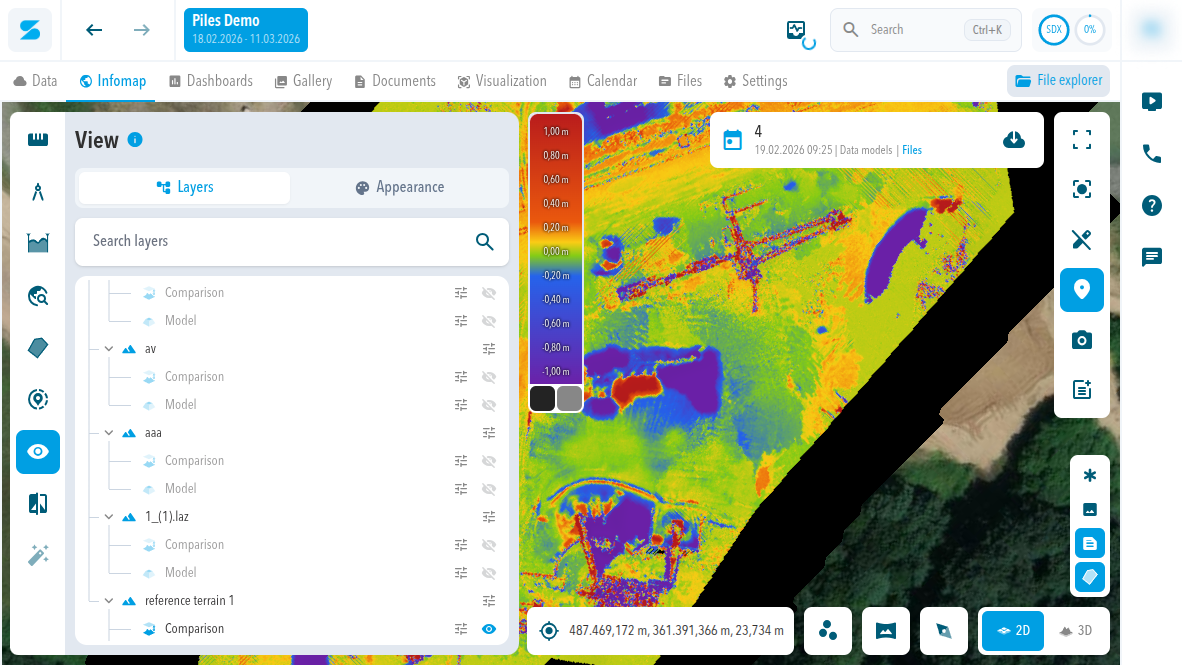
- Open Infomap in your project.
- Select View in the left toolbar, then Layers.
- Under Reference models, find your model.
- Select the eye button of Model to show the reference model itself.
- Select the eye button of Comparison to show the difference between your data and the reference model.
What the comparison shows
The comparison colors the terrain by its height difference to the reference model. A color legend at the edge of the view shows the scale, for example from -1,00 m to 1,00 m, with the colors of the gradient. Both switches are off when you open the viewer.
Supported formats
LAS, LAZ, XML, DXF, and IFC. For IFC, see SDX-Cloud: IFC support for reference models.
Sodex Mobile
Sodex Mobile does not show 3D plans or reference models, so the app is not affected.
Comments
0 comments
Please sign in to leave a comment.