TL;DR: Infomap now has one view for everything. Switch between 2D and 3D at the bottom right (tilting the camera also turns on 3D), turn data on and off under View > Layers, change how the combined surface looks (appearance, contours, and hillshading) with the settings button of its entry, and fine-tune points and the scene with the two buttons next to the 2D/3D switch.
One view for 2D and 3D
There are no separate 2D and 3D views any more. One view shows all your data, including meshes from mesh bundles and IFC models.
To open a data model in the viewer, select its open button in the Data models list, or View in infomap in its row menu. The card at the top right shows the name and date of the data model, a Files link to its processed files, and a download button.
Switch between 2D and 3D
- Select 2D or 3D in the lower-right corner of the view.
- Move the camera to a top-down position and the view switches to 2D by itself.
- Tilt the camera away from the top-down position and the 3D view turns on by itself. You do not have to select 3D.
Mouse and trackpad navigation work as before.
The toolbars
Left toolbar
Measurement layers stay in SDX-CAD and comparisons stay in Terrain Operations, as before.
| Tool | What it opens |
|---|---|
| Measure | Measurement tools for lines, areas, heights, and points |
| SDX-CAD | Your SDX-CAD objects and measurement layers |
| Cross sections | Cross sections of the terrain |
| Pins | Pins on the map, with filter and select all |
| Geofences | The geofences of the project |
| Storages | The storages of the project |
| View | Layers of the view, with display settings for the combined surface |
| Terrain Operations | Comparisons and Site Balances |
Right toolbar
- Full screen shows the view without the rest of the page.
- Location shows or hides location markers on the map.
- Take screenshot saves an image of the view: 3D Visualization only saves only the terrain without menus; Canvas and UI saves the full view including the sidebar and map controls. Options: Hide cursor and Annotate afterwards.
- Capture views takes one or more screenshots of the current view for a document. You can close the dialog, change the view, and add more captures before you continue.
Bottom right
- Point settings: Point size and Point shape (Square, Circle, or Paraboloid) for point clouds.
- Scene settings: Polygon opacity, Respect depth for measurements, Background color, Point budget, and further display settings.
- 2D and 3D.
- A loading indicator shows how much of the data has loaded, for example 100% · 44 / 44.
The View panel
Select View in the left toolbar. The panel lists the layers of the view. What it offers depends on whether you are in 2D or 3D.
Layers
Turn data on and off with the eye button of each entry. Zoom to layer moves the camera to that data. A search field at the top finds an entry by name.
- Combined surfaces: the rasterized surface model made from the primary files, with Primary and Secondary.
- 3D assets: one entry per dataset, named after its primary file. Under it, each part of the dataset, for example Point cloud and the mesh.
- Basemap: the background map, with Labels.
- 2D plans, Orthophotos, and Reference models: each in its own section.
Combined surface settings
Select the settings button in the Primary row under Combined surfaces. A panel for the combined surface opens next to the layer list, with three tabs: Appearance, Contours, and Hillshading. Close it with the X at the top right.
Appearance
- Display as: Tiles or Point cloud.
- Coloring: RGB, Height gradient, Reflectivity, or Inclination.
- Opacity of the surface, as a percentage.
Contours
Contours displays contour lines to better visualize elevation differences. Turn the switch on to show them.
- Interval in m between the lines.
- A color for the lines.
- Thickness of the lines.
- Advanced settings: Black threshold, DPI, and Smoothing.
Hillshading
Hillshading shades the terrain based on the configuration, so that slopes and edges stand out. Turn the switch on to apply it.
- Intensity of the shading, as a percentage.
- Smoothing of the shading, as a percentage.
- Advanced settings: Minimum brightness, Maximum brightness, and Maximum slope.
These settings apply to the combined surface only, because it is built from an elevation model. Point clouds and meshes can be full 3D.
Scene settings in detail
- Polygon opacity: how transparent areas and polygons are drawn.
- Respect depth for measurements: when off, measurements are drawn on top of the terrain even where the terrain hides them.
- Background color of the 3D view.
- Point budget: how many points the 3D view shows, 5,000,000 by default. A higher value shows more detail but may slow down less powerful computers.
Each value has a reset button that returns it to the default.
Measure
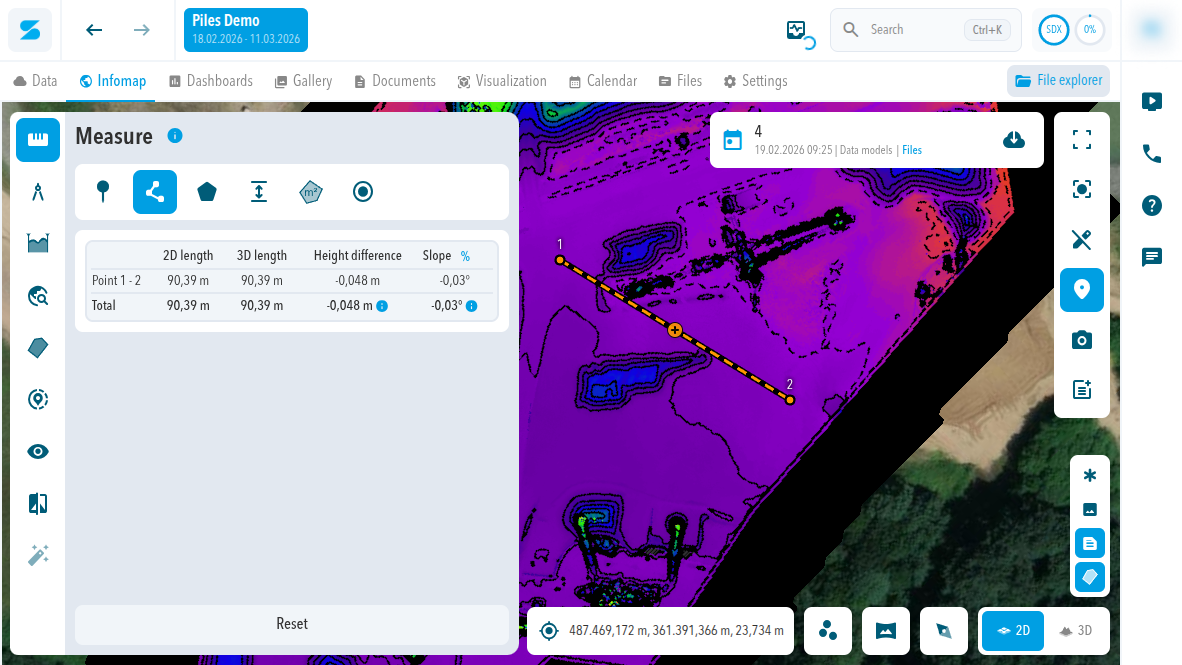
- Select Measure in the left toolbar.
- Select a tool: line, area, height, or point.
- Click the points in the view. Double-click to finish.
Measurement result
The result shows the coordinates of each point and, per segment and in total, the 2D length, 3D length, Height difference, and Slope in % and degrees. Reset removes the measurement.
Measurement tools work on all data, including point clouds, meshes, and IFC models. Measure in a top-down view where you can: on tilted terrain the mouse position is easy to misread in perspective.
Saved settings
Viewer settings such as layer visibility, point size, and point budget are stored in your browser, not in your account. They are not shared between users, browsers, or devices.
Requirements
There is no specific browser or hardware requirement. For large datasets, use a reasonably capable computer.
Comments
0 comments
Please sign in to leave a comment.